Filtering tool
With Labfolder you can filter your data by a number of ways. Use the filter bar on the top panel of the Notebook view. Filtering your data by the following options will help expedite your data retrieval. Spend less time searching and more time doing your experiments!

![]() Filter by Project: You can select from a list or start typing in the project names.
Filter by Project: You can select from a list or start typing in the project names.
![]()
Filter by Author: You can look for authors by selecting the person or people in the drop down list or again type them into the search bar. If you select a group, then all people involved in that group will be selected for author filtering.
![]()
Filter by Tag(s): This is useful for finding projects where you used a specific antibody or piece of equipment. You can scroll through the alphabetical list of tags or start typing to narrow down the options. Then select the desired tag.
![]()
Filter by Dates: Here you can search by created, modified, or custom dates between a certain date range.
Add tags
Just like how Post-it notes can help you organize your lab notebook, tags in Labfolder can serve the same purpose and do it even better. Labfolder employs a tagging system that can help set up your data in a way that can be unified within your team.
To simplify the search for data for you and your colleagues, keywords can be used as a unique identifier of the technique, reagent or other experimental details. In this way, the tags not only help you to find data quicker but also provide a short summary of the entry below.

- Go to your entry and click on
Add Tags. - Add a tag by selecting from the list of previously used tags or simply type in the cell.
- Click
Xat the top right corner of the editing box to exit.
Add custom dates
What if you have a number of entries all using the same tags and you need to quickly find a specific entry? Labfolder allows you to add entries to a list of favorites by simply clicking the star icon on the right-hand side of your data entry. Entries can be added to favorites regardless of whether or not you are the original author. Using the main navigation bar at the top of your notebook you can then use the favorite option to filter for your most valuable entries!
- Go to the entry you want to save and click the star icon on the top right corner. Once you’ve clicked the star, your entry will be in your list of favorites.
- To filter for your favorite entries, navigate to the top of your notebook, select the ‘Favorite’ option and click apply
- To remove an entry from your list of favorites, simply click on the star icon again and it will no longer appear when using this filter.
Create Entry References
You know that in your entry header you will see the creation and last edit date for an entry. But did you know you can add custom dates? These are especially useful for annotating important steps in your experiments and projects.
You might want to indicate when a specific step of an experiment was done – while it is already recorded in the edit history, you may want a way to quickly see when, for example, a transfection was carried out. It could also be the due date for a part of the project or a date after which no more edits should be made.
- Go to your entry and click
Expandwhere it says custom dates - Enter a name or select one from the dropdown list in the left cell written custom date.
- Click on the cell to the right and select a date from the calendar.
- Confirm your changes by closing the box.
Search through entries
As mentioned before, you can search the data in your notebook. With the search tool you can search for content within your entries. This refers to the words and numbers used in your entries. By being able to search for entry content, you can save yourself the time that you would otherwise spend leafing through endless paper notes!
Use Advanced Search
To make it much easier to find the data and entries you seek, Labfolder offers a unique Advanced Search feature, an important part of your electronic lab notebook. You can search for entries based on anything from a custom date, to a certain DE group, or even tags added to entries. It improves the ease of use of your ELN so that you can find what you’re looking for.

Search by categories
There are currently eleven categories to search from in the Advanced Search function:
- Click on the magnifying glass icon at the top right.
- Select the
Advanced Searchoption. - Choose which category you want to search from.
- Enter the parameters of which to search.
- Hit the
Searchbutton. - Choose the entry you are looking for.
Search with automatic adaptation
You know that 500 μl is the same as 0.5 ml and that 600 μl is bigger than both, but so far there was no tool that provided an equivalent artificial intelligence in a scientific setting. Thanks to Advanced Search and Data Elements, Labfolder allows a better organization of your data as you can be confident when you search that it’ll show up even if the units are different, as long as the amounts are equal.

- In the
Advanced Search, selectNumerical Data Element. - Name the data element and physical quantity.
- From a drop down menu you are now able to select different mathematical comparison operations.
- Hit the
Searchbutton and choose the entry you are looking for.
Apply logic gates
The Advanced Search can provide you with even better data insights. You will be able to apply logic gates (AND, OR, NOT) allowing you to fine-tune your search. For example, you can search for all the PCR experiments where you added 0.5 ml of buffer to the mix but did NOT use TAQ Polymerase.
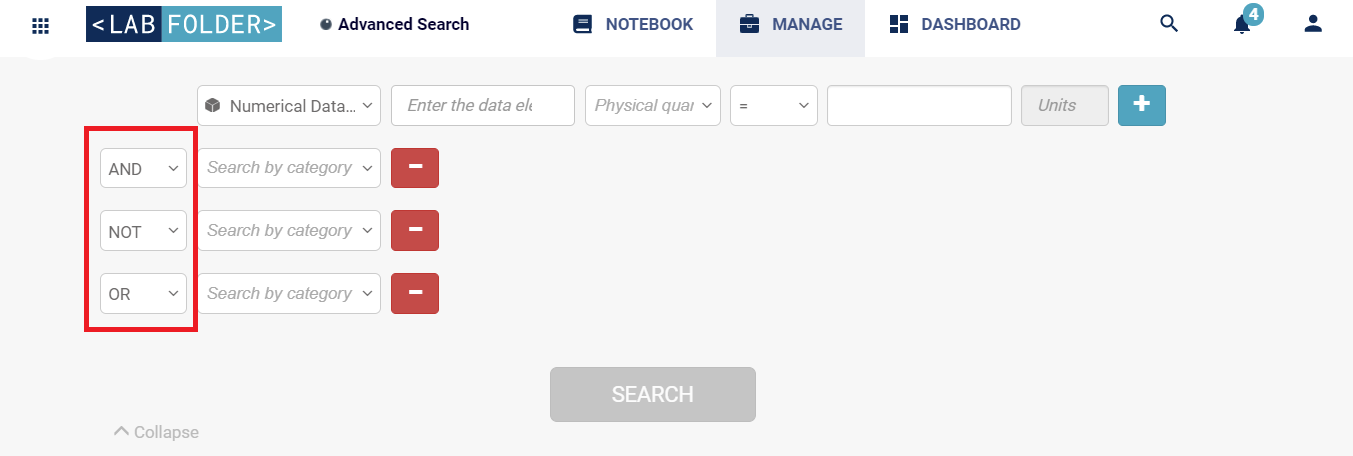
- Add another row of information by clicking the plus to the right end of the existing row.
- Click on the downward arrow in the first cell of the new row.
- In the dropdown menu, select AND, NOT or OR to filter your searching.
![]()
Advanced Search is also available in templates. So you can always find all these search options in the templates you are using and sharing with your team.
Data Exports
PDF Exports
Within Labfolder you are able to export either your entry or entire project as a PDF. You can choose between using our Beta version that preserves your existing entry layout (that can be fully customized thanks to the grid layout feature) or alternatively opt for using our classic version which offers a more structured approach whereby all entry material is standardized to the same width.
With our Beta version you are then also able to visualize how your PDF export will look by clicking on the Preview button.
Simply navigate to the top right hand corner of an entry and click on the 3 dots, select Export as PDF and a pop up window will appear with the various options including:
- What will be exported – the single entry or entire project.
- The file name.
- Whether it will be exported using the new Beta version.
Then when you’re ready and have selected your choice, click Export!
